New version of OS (CentOS 8.1) was installed to new VM with following layout:
# lvs
LV VG Attr LSize Pool Origin Data% Meta% Move Log Cpy%Sync Convert
home cl -wi-a—– 441.10g
root cl -wi-ao—- 50.00g
swap cl -wi-ao—- 7.89g
# pvdisplay /dev/sda2 -m
— Physical volume —
PV Name /dev/sda2
VG Name cl
PV Size <499.00 GiB / not usable 3.00 MiB
Allocatable yes
PE Size 4.00 MiB
Total PE 127743
Free PE 110362
Allocated PE 17381
PV UUID fB3mro-9lDl-lMBg-0jNh-qqzx-PReV-iHUu8T
— Physical Segments —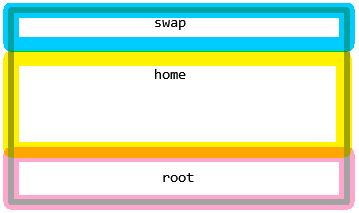
Physical extent 0 to 2020:
Logical volume /dev/cl/swap
Logical extents 0 to 2020
Physical extent 2021 to 114942:
Logical volume /dev/cl/home
Logical extents 0 to 112921
Physical extent 114943 to 127742:
Logical volume /dev/cl/root
Logical extents 0 to 12799
We have 440GB disk space for home directory. There is one user and it has nothing in his directory. We know that XFS can not be shrunk and we have to do following exercise:-)
# ll /home
total 0
drwx——. 2 xpadm xpadm 6 Jun 16 09:40 xpadm
# umount /home
Remove /home directory and we will recreate it with smaller size.
# lvremove /dev/cl/home
Do you really want to remove active logical volume cl/home? [y/n]: y
Logical volume “home” successfully removed
Our new size will be 10GB:
# lvcreate -L 10G -n home cl
WARNING: xfs signature detected on /dev/cl/home at offset 0. Wipe it? [y/n]: y
Wiping xfs signature on /dev/cl/home.
Logical volume “home” created.
The OS complains about existing XFS filesystem on volume, but it is OK we wanted to delete it
# vgchange -a y
3 logical volume(s) in volume group “cl” now active
Create a new XFS filesystem and restore home directory on it
# mkfs.xfs /dev/cl/home
meta-data=/dev/cl/home isize=512 agcount=4, agsize=655360 blks
= sectsz=512 attr=2, projid32bit=1
= crc=1 finobt=1, sparse=1, rmapbt=0
= reflink=1
data = bsize=4096 blocks=2621440, imaxpct=25
= sunit=0 swidth=0 blks
naming =version 2 bsize=4096 ascii-ci=0, ftype=1
log =internal log bsize=4096 blocks=2560, version=2
= sectsz=512 sunit=0 blks, lazy-count=1
realtime =none extsz=4096 blocks=0, rtextents=0
# mount /home
# ll /home
total 0
# mkdir /home/xpadm
# ll /home
total 0
drwxr-xr-x. 2 root root 6 Jun 16 09:40 xpadm
# chmod 700 /home/xpadm/
# chown xpadm:xpadm /home/xpadm/
# ll /home
total 0
drwx——. 2 xpadm xpadm 6 Jun 16 09:40 xpadm
We have freed up plenty of space and we need to prepare vg cl for shrinking:
# vgs
VG #PV #LV #SN Attr VSize VFree
cl 1 3 0 wz–n- <499.00g 431.10g
# pvs
PV VG Fmt Attr PSize PFree
/dev/sda2 cl lvm2 a– <499.00g 431.10g
Let’s check details how physical segments are allocated inside vg cl
# pvdisplay /dev/sda2 -m
— Physical volume —
PV Name /dev/sda2
VG Name cl
PV Size <499.00 GiB / not usable 3.00 MiB
Allocatable yes
PE Size 4.00 MiB
Total PE 127743
Free PE 110362
Allocated PE 17381
PV UUID fB3mro-9lDl-lMBg-0jNh-qqzx-PReV-iHUu8T
— Physical Segments —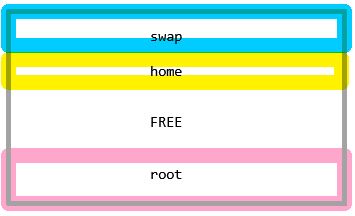
Physical extent 0 to 2020:
Logical volume /dev/cl/swap
Logical extents 0 to 2020
Physical extent 2021 to 4580:
Logical volume /dev/cl/home
Logical extents 0 to 2559
Physical extent 4581 to 114942:
FREE
Physical extent 114943 to 127742:
Logical volume /dev/cl/root
Logical extents 0 to 12799
We have free space between the new /home and the old /. If we shrink the space now we will cut the / and the system will be lost. We need to move the FREE segments to the end of the disk space. Let’s do a small trick by adding new disk /dev/sdb1 to vg and then move / physical extents to the new physical volume in vg cl. It is possible to do it online and it will free up the disk space up to the end of physical volume /dev/sda2. Then we will move them back and OS will use extents right behind our new smaller /home directory.
# pvcreate /dev/sdb1
Physical volume “/dev/sdb1” successfully created.
# vgextend cl /dev/sdb1
Volume group “cl” successfully extended
# vgs
VG #PV #LV #SN Attr VSize VFree
cl 2 3 0 wz–n- 648.99g <581.10g
# pvs -o+pv_used
PV VG Fmt Attr PSize PFree Used
/dev/sda2 cl lvm2 a– <499.00g 431.10g 67.89g
/dev/sdb1 cl lvm2 a– <150.00g <150.00g 0
# pvmove -n /dev/cl/root /dev/sda2 /dev/sdb1
/dev/sda2: Moved: 0.02%
/dev/sda2: Moved: 3.41%
…
/dev/sda2: Moved: 96.80%
/dev/sda2: Moved: 100.00%
# pvmove -n /dev/cl/root /dev/sdb1 /dev/sda2
/dev/sdb1: Moved: 0.00%
/dev/sdb1: Moved: 3.09%
…
/dev/sdb1: Moved: 98.88%
/dev/sdb1: Moved: 100.00%
When we check the space in physical volume /dev/sda2 we can see that extents were properly copied behind /home and there is plenty of space at the end of the physical volume from physical extent 17831.
# pvdisplay /dev/sda2 -m
— Physical volume —
PV Name /dev/sda2
VG Name cl
PV Size <499.00 GiB / not usable 3.00 MiB
Allocatable yes
PE Size 4.00 MiB
Total PE 127743
Free PE 110362
Allocated PE 17381
PV UUID fB3mro-9lDl-lMBg-0jNh-qqzx-PReV-iHUu8T
— Physical Segments —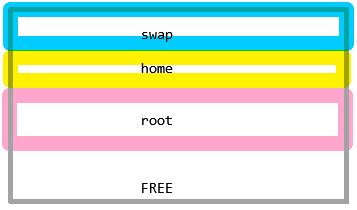
Physical extent 0 to 2020:
Logical volume /dev/cl/swap
Logical extents 0 to 2020
Physical extent 2021 to 4580:
Logical volume /dev/cl/home
Logical extents 0 to 2559
Physical extent 4581 to 17380:
Logical volume /dev/cl/root
Logical extents 0 to 12799
Physical extent 17381 to 127742:
FREE
Now we have free space at the end of physical disk /dev/sda2 and we can shrink PV to 80GB. (Yes, we can do calculation here, but it will not be fun) The size of 80 GB is enough to accommodate the disk space for current swap, /home and /.
# fdisk -l /dev/sda
Disk /dev/sda: 500 GiB, 536870912000 bytes, 1048576000 sectors
Units: sectors of 1 * 512 = 512 bytes
Sector size (logical/physical): 512 bytes / 512 bytes
I/O size (minimum/optimal): 512 bytes / 512 bytes
Disklabel type: dos
Disk identifier: 0x845c40d9
Device Boot Start End Sectors Size Id Type
/dev/sda1 * 2048 2099199 2097152 1G 83 Linux
/dev/sda2 2099200 1048575999 1046476800 499G 8e Linux LVM
# pvresize –setphysicalvolumesize 80G /dev/sda2
/dev/sda2: Requested size 80.00 GiB is less than real size <499.00 GiB. Proceed? [y/n]: y
WARNING: /dev/sda2: Pretending size is 167772160 not 1046476800 sectors.
Physical volume “/dev/sda2” changed
1 physical volume(s) resized or updated / 0 physical volume(s) not resized
The command pvresize complains about our size, because it is smaller than actual size of /dev/sda2 (499GB). Anyway it works fine and our free space was decreased and there are still free extents for future use.
# pvdisplay /dev/sda2 -m
— Physical volume —
PV Name /dev/sda2
VG Name cl
PV Size <80.00 GiB / not usable 3.00 MiB
Allocatable yes
PE Size 4.00 MiB
Total PE 20479
Free PE 3098
Allocated PE 17381
PV UUID fB3mro-9lDl-lMBg-0jNh-qqzx-PReV-iHUu8T
— Physical Segments —
Physical extent 0 to 2020:
Logical volume /dev/cl/swap
Logical extents 0 to 2020
Physical extent 2021 to 4580:
Logical volume /dev/cl/home
Logical extents 0 to 2559
Physical extent 4581 to 17380:
Logical volume /dev/cl/root
Logical extents 0 to 12799
Physical extent 17381 to 20478:
FREE
We do not need additional disk in vg cl then we will remove it:
# vgreduce cl /dev/sdb1
Removed “/dev/sdb1” from volume group “cl”
# vgs
VG #PV #LV #SN Attr VSize VFree
cl 1 3 0 wz–n- <80.00g 12.10g
# vgdisplay
— Volume group —
VG Name cl
System ID
Format lvm2
Metadata Areas 1
Metadata Sequence No 15
VG Access read/write
VG Status resizable
MAX LV 0
Cur LV 3
Open LV 3
Max PV 0
Cur PV 1
Act PV 1
VG Size <80.00 GiB
PE Size 4.00 MiB
Total PE 20479
Alloc PE / Size 17381 / 67.89 GiB
Free PE / Size 3098 / 12.10 GiB
VG UUID 0XLSu8-aOeE-Mdg1-5ViQ-2zaQ-9hPv-X9T4h1
The new layout of vg cl reports size only 80 GB.
# vgdisplay -v
— Volume group —
VG Name cl
System ID
Format lvm2
Metadata Areas 1
Metadata Sequence No 15
VG Access read/write
VG Status resizable
MAX LV 0
Cur LV 3
Open LV 3
Max PV 0
Cur PV 1
Act PV 1
VG Size <80.00 GiB
PE Size 4.00 MiB
Total PE 20479
Alloc PE / Size 17381 / 67.89 GiB
Free PE / Size 3098 / 12.10 GiB
VG UUID 0XLSu8-aOeE-Mdg1-5ViQ-2zaQ-9hPv-X9T4h1
— Logical volume —
LV Path /dev/cl/swap
LV Name swap
VG Name cl
LV UUID 3yJjj2-cLdt-uaiT-C3er-i2Zx-u0JY-Ip0xG4
LV Write Access read/write
LV Creation host, time localhost, 2020-03-12 09:23:04 +0100
LV Status available
# open 2
LV Size 7.89 GiB
Current LE 2021
Segments 1
Allocation inherit
Read ahead sectors auto
– currently set to 8192
Block device 253:1
— Logical volume —
LV Path /dev/cl/root
LV Name root
VG Name cl
LV UUID LAmWX2-3DSS-VD7d-9rWs-SFzc-hTni-akto3r
LV Write Access read/write
LV Creation host, time localhost, 2020-03-12 09:23:06 +0100
LV Status available
# open 1
LV Size 50.00 GiB
Current LE 12800
Segments 1
Allocation inherit
Read ahead sectors auto
– currently set to 8192
Block device 253:0
— Logical volume —
LV Path /dev/cl/home
LV Name home
VG Name cl
LV UUID 3NCUe4-JZVY-FdkD-h8mC-Xuuz-LL6M-uslaFo
LV Write Access read/write
LV Creation host, time host.example.net, 2020-06-16 09:39:03 +0200
LV Status available
# open 1
LV Size 10.00 GiB
Current LE 2560
Segments 1
Allocation inherit
Read ahead sectors auto
– currently set to 8192
Block device 253:2
— Physical volumes —
PV Name /dev/sda2
PV UUID fB3mro-9lDl-lMBg-0jNh-qqzx-PReV-iHUu8T
PV Status allocatable
Total PE / Free PE 20479 / 3098
OK, the LVM part is done and we are ready to shrink the physical volume /dev/sda. It has 2 partitions. The 1st one is used for booting and the second as LVM physical volume for swap, /home and root.
We will dump the partition layout of /dev/sda to file via sfdisk command.
# sfdisk -d /dev/sda sda_part
label: dos
label-id: 0x845c40d9
device: /dev/sda
unit: sectors
/dev/sda1 : start= 2048, size= 2097152, type=83, bootable
/dev/sda2 : start= 2099200, size= 1046476800, type=8e
# sfdisk -d /dev/sda >sda_part
The editing of dump file we can shrink partition 2 of /dev/sda to the new size. The target was 20000 extents in LVM and each is 4MB. We have sectors 512 bytes then we need 20000 * 8192 = 163840000 sectors. Unfortunately it is only /dev/sda2 and I did not add /dev/sda1, but used following value for whole disk.
# vi sda_part
# cat sda_part
label: dos
label-id: 0x845c40d9
device: /dev/sda
unit: sectors
/dev/sda1 : start= 2048, size= 2097152, type=83, bootable
/dev/sda2 : start= 2099200, size= 163840000, type=8e
The file is applied by sfdisk command with option –no-reread, because we can not change it for running kernel. It was reported as Device or resource busy.
# sfdisk /dev/sda <sda_part –no-reread
Disk /dev/sda: 500 GiB, 536870912000 bytes, 1048576000 sectors
Units: sectors of 1 * 512 = 512 bytes
Sector size (logical/physical): 512 bytes / 512 bytes
I/O size (minimum/optimal): 512 bytes / 512 bytes
Disklabel type: dos
Disk identifier: 0x845c40d9
Old situation:
Device Boot Start End Sectors Size Id Type
/dev/sda1 * 2048 2099199 2097152 1G 83 Linux
/dev/sda2 2099200 1048575999 1046476800 499G 8e Linux LVM
>>> Script header accepted.
>>> Script header accepted.
>>> Script header accepted.
>>> Script header accepted.
>>> Created a new DOS disk label with disk identifier 0x845c40d9.
/dev/sda1: Created a new partition 1 of type ‘Linux’ and of size 1 GiB.
Partition #1 contains a ext4 signature.
/dev/sda2: Created a new partition 2 of type ‘Linux LVM’ and of size 78.1 GiB.
Partition #2 contains a LVM2_member signature.
/dev/sda3: Done.
New situation:
Disklabel type: dos
Disk identifier: 0x845c40d9
Device Boot Start End Sectors Size Id Type
/dev/sda1 * 2048 2099199 2097152 1G 83 Linux
/dev/sda2 2099200 165939199 163840000 78.1G 8e Linux LVM
The partition table has been altered.
Calling ioctl() to re-read partition table.
Re-reading the partition table failed.: Device or resource busy
The kernel still uses the old table. The new table will be used at the next reboot or after you run partprobe(8) or kpartx(8).
Syncing disks.
Then the command partprobe has fixed the issue, but I have done reboot to be sure that we can continue.
# partprobe
# fdisk -l /dev/sda
Disk /dev/sda: 500 GiB, 536870912000 bytes, 1048576000 sectors
Units: sectors of 1 * 512 = 512 bytes
Sector size (logical/physical): 512 bytes / 512 bytes
I/O size (minimum/optimal): 512 bytes / 512 bytes
Disklabel type: dos
Disk identifier: 0x845c40d9
Device Boot Start End Sectors Size Id Type
/dev/sda1 * 2048 2099199 2097152 1G 83 Linux
/dev/sda2 2099200 165939199 163840000 78.1G 8e Linux LVM
# reboot
After reboot pvs is complaining that /dev/sda2 is smaller than PV created on it. We have 2 choices to fix it:
- Shrink PV
- Extend /dev/sda2
The option to extend /dev/sda2 needs dumping and editing of disk table, it is easier to shrink PV:
# pvs
WARNING: Device /dev/sda2 has size of 163840000 sectors which is smaller than corresponding PV size of 167770112 sectors. Was device resized?
WARNING: One or more devices used as PVs in VG cl have changed sizes.
PV VG Fmt Attr PSize PFree
/dev/sda2 cl lvm2 a– <80.00g 12.10g
# fdisk -l /dev/sda
Disk /dev/sda: 78.1 GiB, 83886080000 bytes, 163840000 sectors
Units: sectors of 1 * 512 = 512 bytes
Sector size (logical/physical): 512 bytes / 512 bytes
I/O size (minimum/optimal): 512 bytes / 512 bytes
Disklabel type: dos
Disk identifier: 0x845c40d9
Device Boot Start End Sectors Size Id Type
/dev/sda1 * 2048 2099199 2097152 1G 83 Linux
/dev/sda2 2099200 165939199 163840000 78.1G 8e Linux LVM
After checking real size of /dev/sda2 we can do pvresize:
# pvresize –setphysicalvolumesize 161740800s /dev/sda2
WARNING: Device /dev/sda2 has size of 161740800 sectors which is smaller than corresponding PV size of 167770112 sectors. Was device resized?
WARNING: One or more devices used as PVs in VG cl have changed sizes.
Physical volume “/dev/sda2” changed
1 physical volume(s) resized or updated / 0 physical volume(s) not resized
# pvs
PV VG Fmt Attr PSize PFree
/dev/sda2 cl lvm2 a– 77.12g <9.23g
/dev/sdb1 lvm2 — <150.00g <150.00g
# reboot
After reboot there is no more complains and PV size matches /dev/sda2 size.
# vgs
VG #PV #LV #SN Attr VSize VFree
cl 1 3 0 wz–n- 77.12g <9.23g
# pvs
PV VG Fmt Attr PSize PFree
/dev/sda2 cl lvm2 a– 77.12g <9.23g
/dev/sdb1 lvm2 — <150.00g <150.00g
# fdisk -l /dev/sda
Disk /dev/sda: 78.1 GiB, 83886080000 bytes, 163840000 sectors
Units: sectors of 1 * 512 = 512 bytes
Sector size (logical/physical): 512 bytes / 512 bytes
I/O size (minimum/optimal): 512 bytes / 512 bytes
Disklabel type: dos
Disk identifier: 0x845c40d9
Device Boot Start End Sectors Size Id Type
/dev/sda1 * 2048 2099199 2097152 1G 83 Linux
/dev/sda2 2099200 165939199 163840000 78.1G 8e Linux LVM
Anyway it is not true. The Linux box is running in VMware environment and we just need to decrease the size of the virtual disk. Just fire up the webconsole and do it.
There is something wrong:

VMware GUI does not want to shrink the volume. Fortunately there are plenty of clever people around and one of them just made following article.
It is for windows, but Linux is easier to do it. The procedure is like this:
- Shutdown VM
- Login to esxi server as root
- Do calculation (80GB = 80 * 1024 * 1024 * 1024 / 512) or take the number directly from fstab 163840000 sectors
- Change to directory /vmfs/volumes/<DS-dir>/<VM-dir>
- Edit VM.vmdk file
- Change number of sectors like this:
From:
# Extent description
RW 1048576000 VMFS “vm-flat.vmdk”
To:
# Extent description
RW 163840000 VMFS “vm-flat.vmdk”
- Migrate VM to a different DS
- Start up VM and the size is changed.
# fdisk -l /dev/sda
Disk /dev/sda: 78.1 GiB, 83886080000 bytes, 163840000 sectors
Units: sectors of 1 * 512 = 512 bytes
Sector size (logical/physical): 512 bytes / 512 bytes
I/O size (minimum/optimal): 512 bytes / 512 bytes
Disklabel type: dos
Disk identifier: 0x845c40d9
Device Boot Start End Sectors Size Id Type
/dev/sda1 * 2048 2099199 2097152 1G 83 Linux
/dev/sda2 2099200 165939199 163840000 78.1G 8e Linux LVM
# vgdisplay -v
— Volume group —
VG Name cl
System ID
Format lvm2
Metadata Areas 1
Metadata Sequence No 16
VG Access read/write
VG Status resizable
MAX LV 0
Cur LV 3
Open LV 3
Max PV 0
Cur PV 1
Act PV 1
VG Size 77.12 GiB
PE Size 4.00 MiB
Total PE 19743
Alloc PE / Size 17381 / 67.89 GiB
Free PE / Size 2362 / <9.23 GiB
VG UUID 0XLSu8-aOeE-Mdg1-5ViQ-2zaQ-9hPv-X9T4h1
— Logical volume —
LV Path /dev/cl/swap
LV Name swap
VG Name cl
LV UUID 3yJjj2-cLdt-uaiT-C3er-i2Zx-u0JY-Ip0xG4
LV Write Access read/write
LV Creation host, time localhost, 2020-03-12 09:23:04 +0100
LV Status available
# open 2
LV Size 7.89 GiB
Current LE 2021
Segments 1
Allocation inherit
Read ahead sectors auto
– currently set to 8192
Block device 253:1
— Logical volume —
LV Path /dev/cl/root
LV Name root
VG Name cl
LV UUID LAmWX2-3DSS-VD7d-9rWs-SFzc-hTni-akto3r
LV Write Access read/write
LV Creation host, time localhost, 2020-03-12 09:23:06 +0100
LV Status available
# open 1
LV Size 50.00 GiB
Current LE 12800
Segments 1
Allocation inherit
Read ahead sectors auto
– currently set to 8192
Block device 253:0
— Logical volume —
LV Path /dev/cl/home
LV Name home
VG Name cl
LV UUID 3NCUe4-JZVY-FdkD-h8mC-Xuuz-LL6M-uslaFo
LV Write Access read/write
LV Creation host, time host.example.net, 2020-06-16 09:39:03 +0200
LV Status available
# open 1
LV Size 10.00 GiB
Current LE 2560
Segments 1
Allocation inherit
Read ahead sectors auto
– currently set to 8192
Block device 253:2
— Physical volumes —
PV Name /dev/sda2
PV UUID fB3mro-9lDl-lMBg-0jNh-qqzx-PReV-iHUu8T
PV Status allocatable
Total PE / Free PE 19743 / 2362
# pvdisplay /dev/sda2 -m
— Physical volume —
PV Name /dev/sda2
VG Name cl
PV Size 77.12 GiB / not usable 2.00 MiB
Allocatable yes
PE Size 4.00 MiB
Total PE 19743
Free PE 2362
Allocated PE 17381
PV UUID fB3mro-9lDl-lMBg-0jNh-qqzx-PReV-iHUu8T
— Physical Segments —
Physical extent 0 to 2020:
Logical volume /dev/cl/swap
Logical extents 0 to 2020
Physical extent 2021 to 4580:
Logical volume /dev/cl/home
Logical extents 0 to 2559
Physical extent 4581 to 17380:
Logical volume /dev/cl/root
Logical extents 0 to 12799
Physical extent 17381 to 19742:
FREE